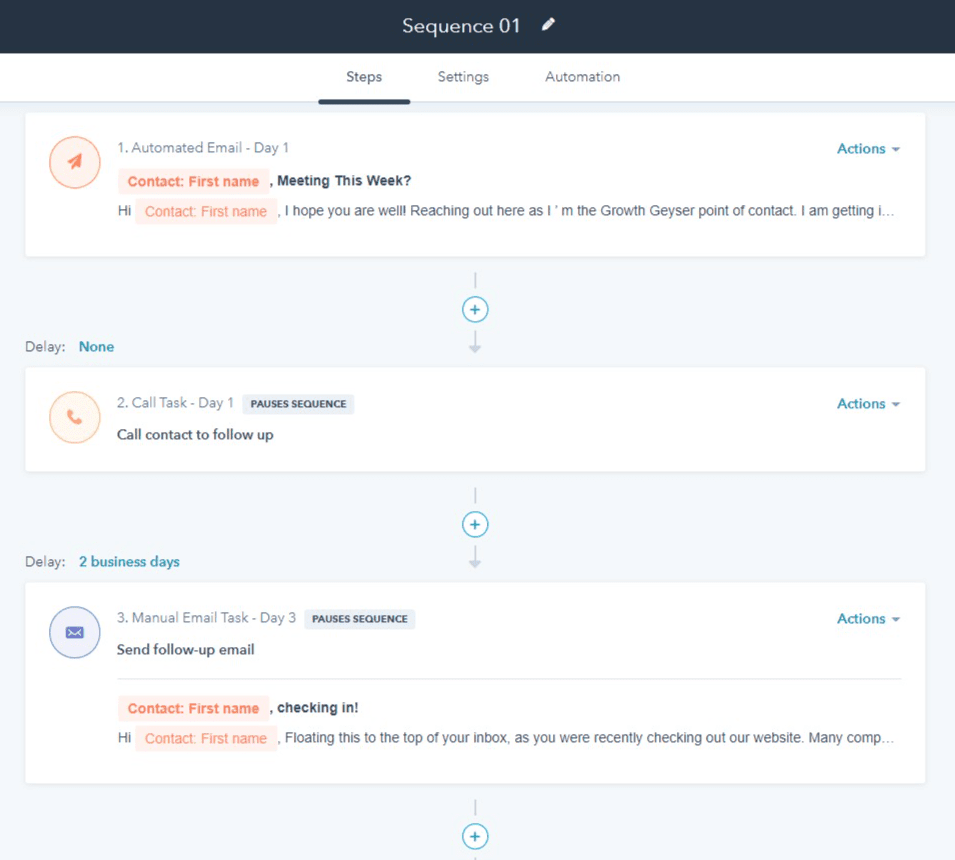
I often get asked how to use Hubspot sequences for maximum effect. For those unfamiliar with sequences, they allow your sales team to manually trigger a series of events including (but not limited to) the following:
- Automated email
- Create a manual email task
- Create a call task
Ideally you should space out these actions over a series of days. Perhaps 5 of these actions spread out over a 14 day period.
Difference Between Workflows & Sequences
Many clients confuse these with ‘workflows’, which are similar in nature but have a different purpose. Where a sequence is typically a function of the sales team, workflows tend to be more a function of marketing.
Here’s an example of a typical workflow use case. You post a gated PDF lead magnet to your site, which requires a contact to fill out a form to access the PDF. Once the contact submits the form, Hubspot enrolls that contact into a workflow which sends them a series of emails. Of course, depending on the actions of the contact, that workflow can twist and turn in many different directions.
Ultimately, that workflow may have a goal associated with it. If the contact achieves the goal (i.e. downloads another piece of content, signs up for a free trial to your service, etc.) then they would likely exit the workflow. In fact, achieving the goal may even enroll them into a subsequent workflow.
They key factors that distinguish this from a Hubspot sequence are the following:
- All steps in the Workflow are typically fully automated (though you can incorporate manual steps too, just as with sequences).
- Enrollment is automatically triggered by an action taken by the contact (i.e. form submission). In the case of a sequence, a member of your organization must manually enroll the contact in Hubspot.
- Hubspot sequence emails originate from your email client server (i.e. Google Workplace, Office 365, etc.), whereas workflow emails originate from Hubspot servers. Therefore, Hubspot sequence emails typically have better deliverability.
- You can only enroll a limited number of contacts into a Hubspot sequence per day. In a Hubspot workflow, a nearly unlimited amount (100’s or even 1,000’s) of contacts can self-enroll per day.
It requires a human to decide when to enroll a contact into a sequence. And we humans only have so many hours in our work days. So we need to be judicious about when to trigger these. Besides, Hubspot places a daily limit on these, so we can’t merely fire off these sequences to every single contact.
1 Useful Tip about When to Enroll a Contact into a Hubspot Sequence
I’ve yet to mention it, but Hubspot sequences contain a 2 built-in goals:
- Contact replies to your email
- Contact books a meeting (one that exists as part of your Hubspot meetings calendar)
That means if anybody enrolled in the sequence performs either of those actions, they leave the sequence. Unlike a workflow, you don’t need to set up these goals in a sequence. They’re pre-built.
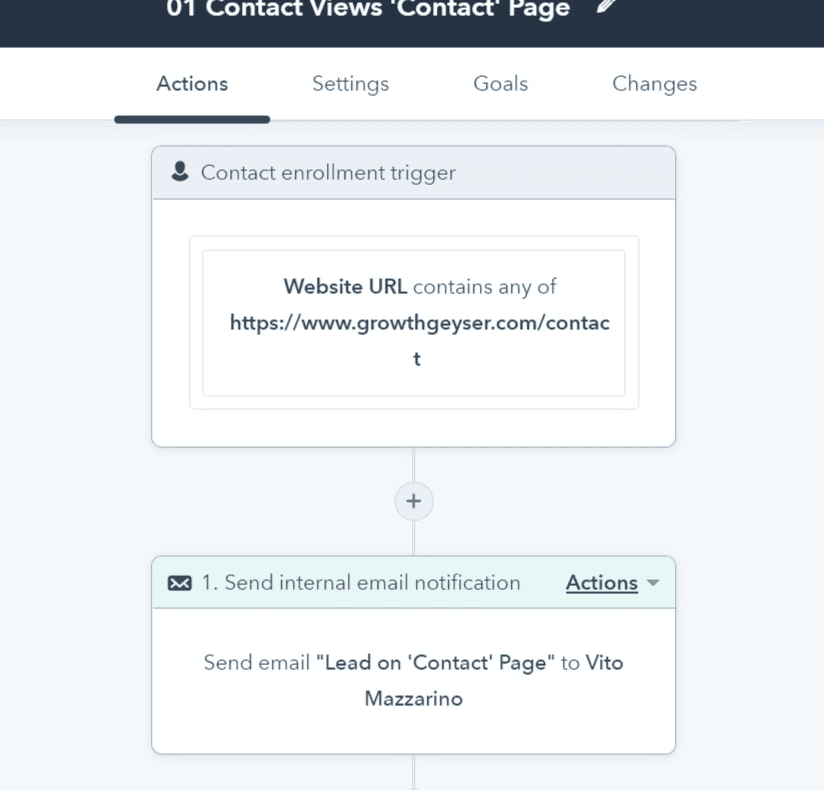
That being the case, an ideal moment to enroll a contact into a sequence is when they’re viewing one of the following pages on your website:
- Pricing Page
- Contact Page
At this point, you may be asking yourself ‘how would I know that?’
Simple. For this to happen the following has to be true:
- The contact (and their email address) need to be captured within Hubspot (i.e. via import, opt-in through a form to receive a marketing asset, manually inputted, etc.).
- You must have the Hubspot site tracking code installed on your website.
- You must have Marketing Hub Pro or Sales Hub Pro plans (or greater)
If those 3 are true you can build a simple workflow as follows:
- Navigate to Workflows
- Click the button Create a Workflow > From Scratch
- Choose Contact Based and Blank Workflow and click Next
- Click Set up triggers
- Choose Contact Properties
- Type in Website URL and choose it
- Choose Contains any of
- Then type in the URL that should trigger the alert (i.e. https://www.mydomain/pricing)
- Then click the + below the trigger to add a step
- Choose Send internal email notification
- Choose the Recipients and Subject according to your needs
- Then configure the Body (I recommend personalization of Email – First Name – Last Name) to alert you to the name of the contact
- Done
The resulting workflow would look something like this:
Of course you can customize this in any manner you choose.
If you need help setting up sequences, workflows, or anything else in Hubspot then don’t hesitate to reach out by clicking the button below!